Getting started
How to set up your first checkout, delivery and payment rules, try them on your own checkout and switch them on for customers.
Install and open the app
- Install TillKit Checkout Rules from the Shopify App Store.
- In your Shopify admin, click Apps and choose "TillKit Checkout Rules".
- The rules page opens inside your admin. You don't need a separate account or login.
Set up your delivery rates and payment methods in Shopify first, as the app works with the ones you already have. Before you add a rule, check that checkout works normally.
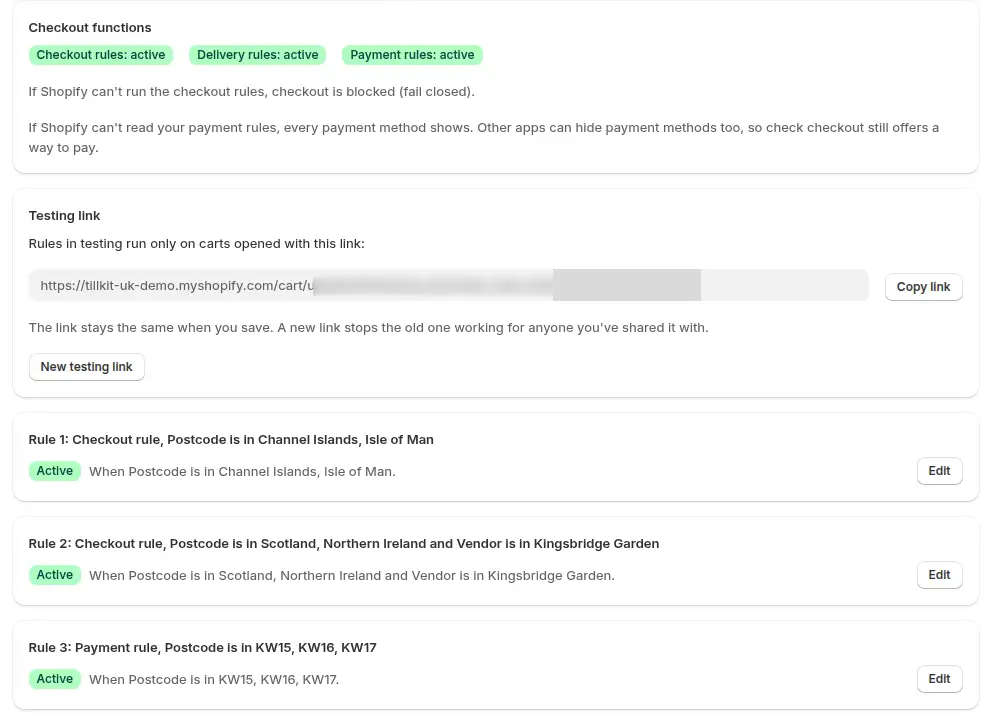
Start from a template
A template sets up one or more rules for a common job, so you only fill in the blanks.
- Under "Start from a template", choose one from the list. Each shows how many rules it adds, what it does and what each rule covers.
- Fill in its blanks, such as the vendors that can't go to Northern Ireland or the lowest basket total.
- Click "Add this rule", or "Add these 2 rules" for a template that adds two. The rules are added switched on, so set them to "Testing (only with the Testing link)" if you'd like to try them first.
- Click Save.
The templates are:
- Northern Ireland off for chosen vendors
- Free delivery hidden in the Highlands and Islands
- Highlands and Islands rate by vendor or tag
- Next day hidden where the courier can't reach
- Channel Islands and Isle of Man off
- Minimum order total, and maximum order total
- PO box and BFPO off
- Postcodes that don't exist blocked
- One carrier for tagged lines
- Suppliers that can't share a basket
- Knives and axes
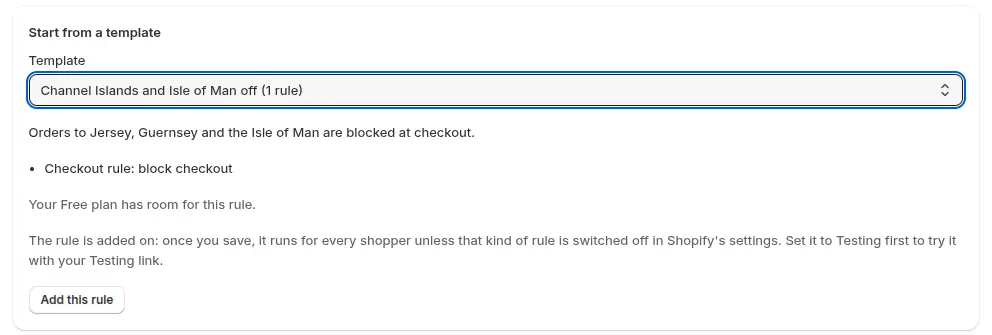
Block products to an area
- Click "Add a checkout rule". The new rule starts with "Postcode" and "is in". Under Then, "Block checkout" is already selected.
- Choose where it applies. Pick a ready-made area under "Preset area" and click "Add preset", or type postcodes in "Postcodes or areas, comma separated (BT, PO30)". For another country, see Postal codes in other countries.
- To block only some products, click "And". The new line shows "Vendor" and "is in". Enter the brand or supplier in "Values, comma separated". To use product tags instead, change "Condition" to "Product tag".
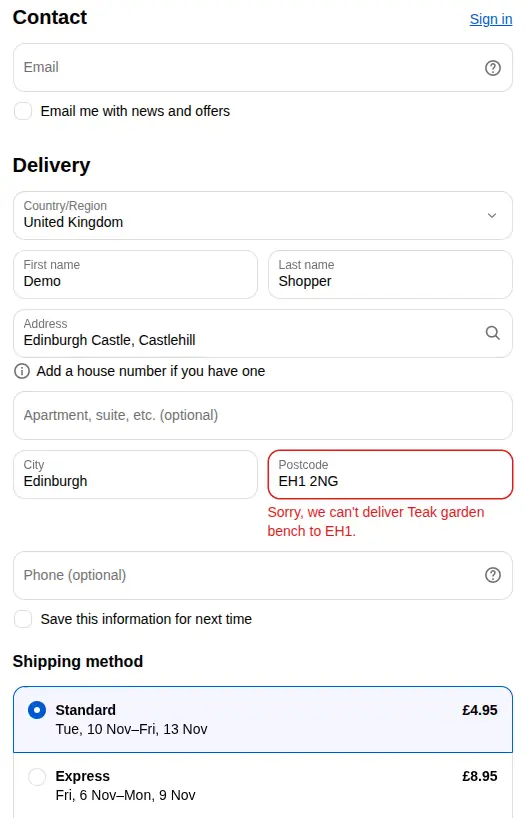
- Check the starting message: "Sorry, we can't deliver {item} to {area}." The app replaces {item} with the item and {area} with the first part of the shopper's postcode, such as PO30. Under "Show the message on", choose "The postcode field" or "The page".
- Set Status to "Active" and click Save. To try it on your own checkout first, see Try a rule first.
A shopper whose postcode matches the rule sees your message and can't complete checkout. If the rule includes a brand, supplier or product tag, the message names the item. Without one, a shopper in PO30 sees "Sorry, we can't deliver your order to PO30."
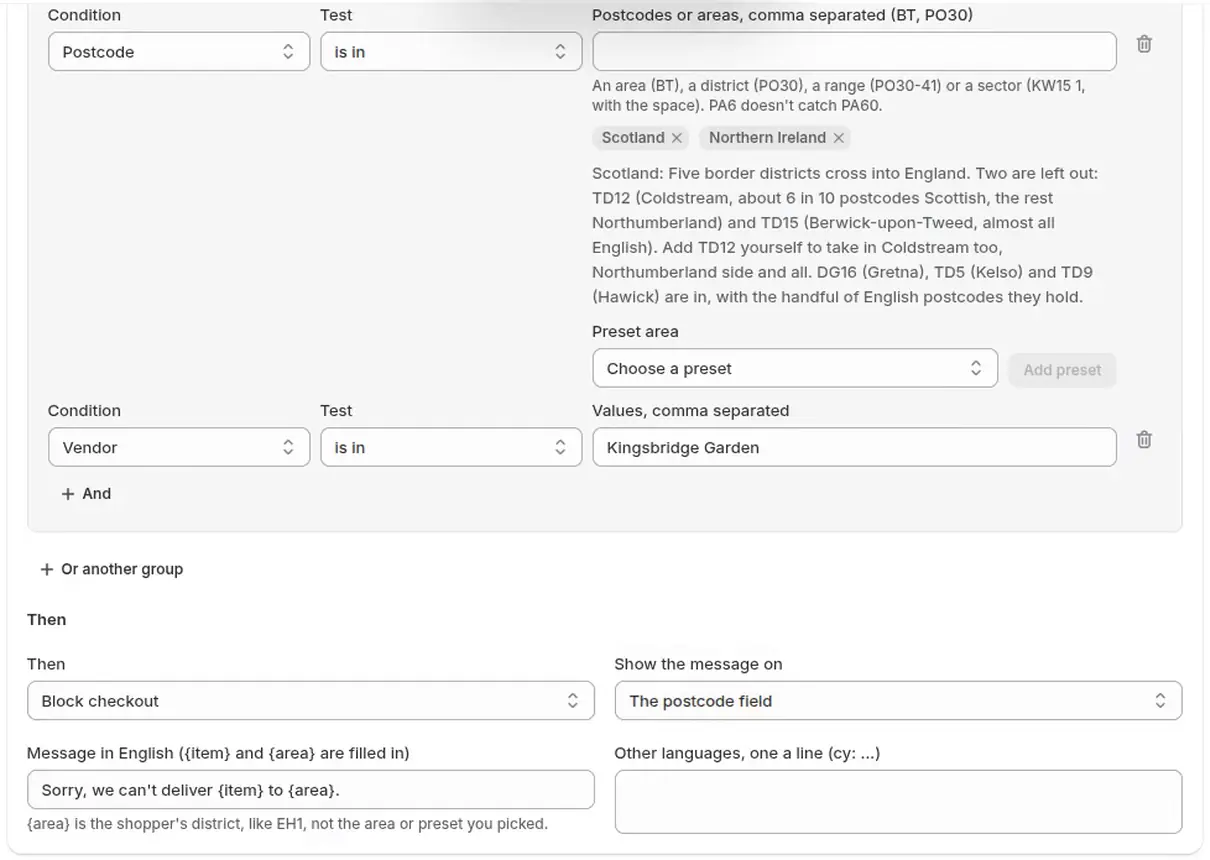
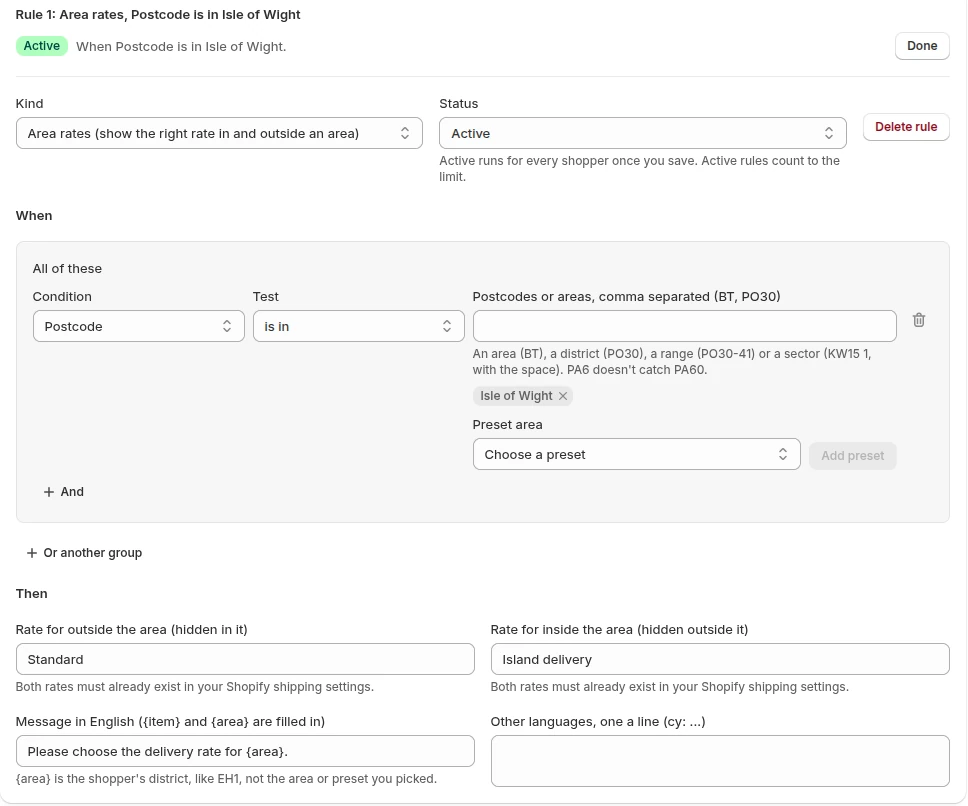
A different rate for an area
You need two delivery rates already set up in Shopify's shipping settings, for example "Standard" for the mainland and "Island delivery" for the island. The app shows one rate or the other and never sets a price.
- Click "Add an area rate pair".
- Choose a ready-made area under "Preset area" and click "Add preset", or type postcodes in "Postcodes or areas, comma separated (BT, PO30)". For another country, see Postal codes in other countries.
- Enter the mainland rate's name in "Rate for outside the area (hidden in it)". Enter the island rate's name in "Rate for inside the area (hidden outside it)".
- Set Status to "Active" and click Save.
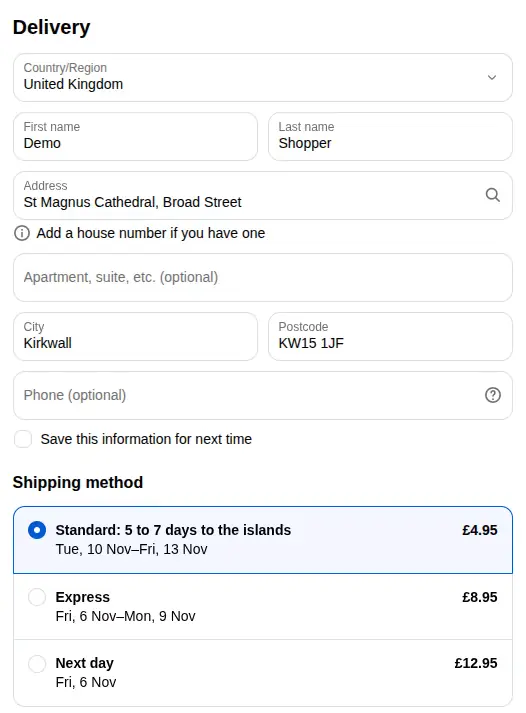
Shoppers in the area see the island rate and everyone else sees the mainland rate. A shopper in the area can't pay while the mainland rate is still selected, and checkout shows them the rule's message.
Hide, rename or reorder rates
- Click "Add a delivery rule" and choose the area.
- Under Then, pick "Hide rates", "Rename rates", "Move rates" or "Show only rates".
- In "Rate names, comma separated" type each rate's name exactly as checkout shows it, such as "Standard".
- To rename a rate, enter its new name in "New name", such as "Standard: 3 to 5 days to the island". To move a rate, set its place in "To position (0 is first)".
- Set Status to "Active" and click Save.
The cheapest rate always stays first, so if a move would put a dearer rate above it, none of the moves in that delivery happen.
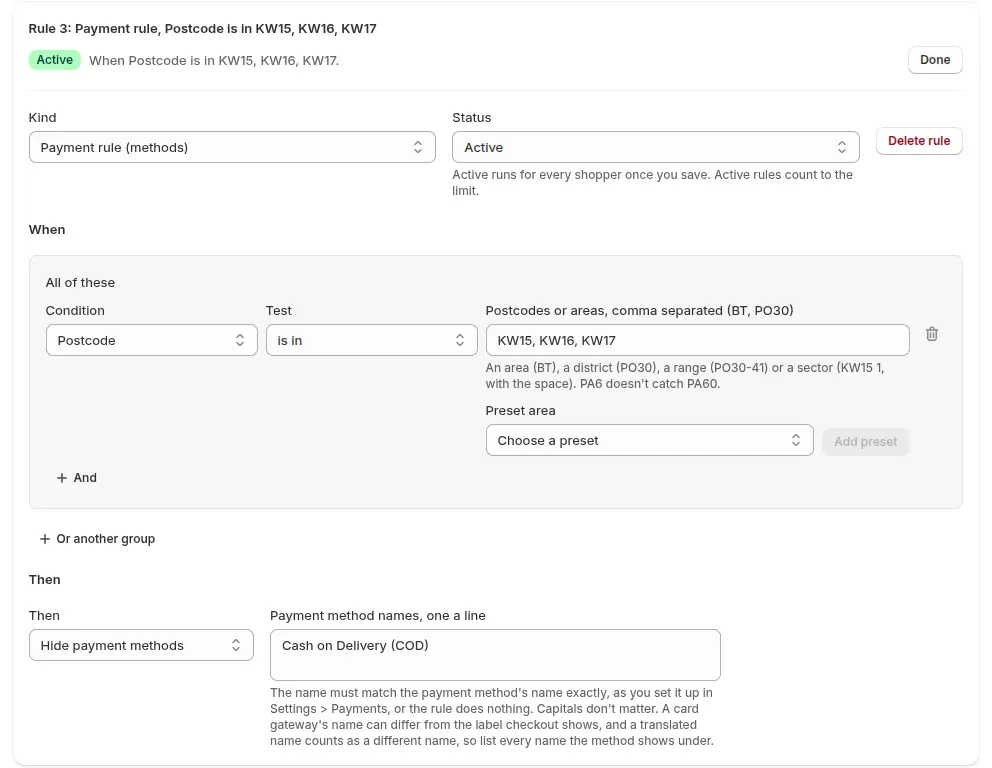
Hide, rename or move payment methods
- Click "Add a payment rule" and choose the area. To act on the basket instead, change "Condition" to "Cart total (£)", set Test to "is under" and type the amount.
- Under Then, pick "Hide payment methods", "Rename payment methods" or "Move payment methods". To rename, enter the new name in "New name". To move, set the place in "To position (0 is first)".
- In "Payment method names, one a line" type each method's name exactly as you set it up in Settings > Payments, such as "Cash on Delivery (COD)". Capitals don't matter, but the name must match or the rule does nothing. A card gateway's name can differ from the label checkout shows, and a translated name counts as a different name, so list every name the method goes by.
- Set Status to "Active" and click Save. If Shopify asks you to approve the app's permission to change payment methods, approve it and the rule saves.
Shopify sets some limits:
- Wallets such as Apple Pay can only be hidden, not renamed or moved, and methods shown as a logo, such as cards, can't be renamed.
- Once a shopper is inside Shop Pay, only its gift card field changes.
- On US and Canadian stores, rules for card payments need Shopify Plus. Without Plus, card payments stay first and a move to 0 does nothing there, so use 1 to go straight after them.
If Shopify can't read your payment rules, every payment method shows. Other apps can hide payment methods too, so check that checkout still offers a way to pay.
Postal codes in other countries
- In any checkout, delivery, area rate or payment rule, change "Condition" to "Postal code, outside the UK" and choose the country under "Country". The Country list holds every country Shopify sells to, and each rule covers one country.
- Type postal codes in "Postal codes, comma separated", or choose a ready-made list under "Pack" and click "Add pack". Each pack shows its source and the date it was read.
- Finish the rule as usual, then click Save.
Type a whole code (75001), the start of one (20), a pattern where ? stands for any one character (?0) or a range of codes the same length (1791-1797). Spaces, hyphens and capitals don't matter, except that a code with a hyphen between two equal halves, like Iran's 12345-67890, is typed without its hyphen, or it reads as a range.
Packs cover islands and hard-to-reach areas in Australia, Canada, Denmark, France, Germany, Greece, Italy, the Netherlands, Norway, Portugal and Spain, such as Corsica, the Canary Islands, Madeira and the Azores.
A rule set to "is not in" never acts on a blank postal code, which only matters where Shopify leaves the postal code optional, such as Ireland.
Try a rule first
A rule you add with "Add a checkout rule" or one of the other Add buttons starts in testing, while a template's rules are added switched on. Customers only see a rule after you set Status to "Active".
- Set the rule's Status to "Testing (only with the Testing link)" and click Save.
- A Testing link box appears on the rules page. Click "Copy link" in that box.
- Open the link in your browser, then go to checkout. The rule applies to your cart but not your customers' carts.
- When it works as you want, set Status to "Active" and click Save.
Saving doesn't change the testing link, so you can send it to a colleague to try the rule too. Open the link again whenever you start a new cart. Click "New testing link" to make a new link and stop the old one working for anyone you shared it with.
To check without a checkout, go to "Check a postcode" on the rules page. Choose the country and type a postcode to see which rules would apply to a test item and the message they'd show. Tick "With the Testing link (runs rules in testing too)" to include rules you're testing.
How to write UK postcodes
Type the part before the space, such as BT or PO30. You can also enter a range such as PO30-41. Separate entries with commas. The How to write postcodes table on the app page lists all the forms with examples.
Free and Unlimited
- On the Free plan, 2 Active rules run in total across checkout, delivery, area rate pair and payment rules. Rules set to Testing or Off don't count, so you can keep others ready to use.
- You can add and save more. The page then says "Saved, but not every rule is running" and names the rules left out. Rules run in the order you added them up to 2, with a template's rules all together or not at all.
- Click "Subscribe to Unlimited" ($5.99 a month after a 7-day free trial) and approve the plan in Shopify, and every Active rule runs. Unlimited is free on development stores.
- If you go back to Free, your earliest Active rules run up to 2, a template's rules all together or not at all. The rest stay saved.
Help
- Read the questions on the app page.
- Send us the rule you need and we'll set it up. Email hello@tillkit.app with your store's address and what you'd like to happen.
- Still stuck? Email hello@tillkit.app with your store's name and the postcode you tried.